I have added some ufo's to my list of major things to do while the snow falls in our little portion of the world, and as they are finished will share. From time to time will share patterns that are originals as I finish these.
I am proud to announce that I have gone over the 125 pay if forward hat challenge for myself and had such a heart warming response from the recipients that I will continue to do this for the coming year as well.
I have given to the local hospital, Inn for the Night - a place where homeless people can be kept warm, given a meal, and now a warm hat, Chrysallis House - a shelter for women and children who will receive their bag of hats this week., the local nursing home children's unit who fell in love with all of the hats. I also will do little gowns and cocoons for the neo natal unit of the local hospital.............but most of all............it feels so good inside to be a silent giver. I have not shared all of my hats on my blog as it would appear boring, but Jackie Young crocheted six of my hats for me and they went to the children's cancer ward and will be treasured.
I am going to start a new blog in the new year for " Comforting Angels ", which will be dedicated to making something for someone else to make them happy and will have free patterns as well as pictures of what I am working on with sewing, knitting, crochet, and of course, my quilting.........
In the immortal words of Tiny Tim " God bless you All "
Thursday, December 10, 2009
Pink Mohair mittens and Hat
.JPG) An original pattern for a front and back hdc pink mohair hat and knit mittens.
An original pattern for a front and back hdc pink mohair hat and knit mittens.Angel of Christmas
 Add lace collage of flowers over shoulder and down front of dress. I also added small beads using tacky glue to the neckline along with one single rose. I allowed a half metre section of ribbon to fall down the front of the dress. I have yet to find my wedding doves, and when I do there will be one placed in her hand.
 Back of angel showing wings added with stitches and tacky glue as well as one single flower to the centre of the wings.
 Angel is now complete and ready to take her place of honour on the top of your tree, or Christmas display.
Pattern is a gift, and a gift is a present that you give someone to make them happy and is not to be sold as a pattern.
(c) Linda Boudreau - Bunnies & Lace 2009
 Add lace to bottom of velvet and seam raw edges of velvet and lace together. Running a strong gathering thread at the top and pull to fit under bust line.
Sew side seams of slip, turn up bottom hem one inch and stitch. Using strong thread gather slip to fit snugly under bust line on head. Squirt a bit of glue front and back and allow to dry.
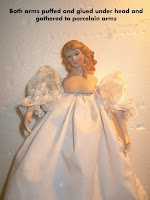 Cut lace piece in half and hem raw edge. Break thread and the slip lace over arm and chenille stem and gather top very tightly. Insert under head and add a dab of glue to hold in place. Repeat for other arm. Set aside to dry.
 Cut lace piece in half and hem raw edge. Break thread and the slip lace over arm and chenille stem and gather top very tightly. Insert under head and add a dab of glue to hold in place. Repeat for other arm. Set aside to dry.
Gather lower edges of sleeves and secure tightly around arms about half way up. I add a dab of glue under this and then tightly tie a six inch piece of ribbon into a bow on each section. Puff up sleeves and allow to dry.


.JPG)

.JPG)
Heirloom Christmas Angel Directions

Materials as pictured above.
Medium sized porcelain head and arms.
Chenille stem
Angel wings
12 x 32 inch piece of white cotton for slip
12 x 32 inch piece of white velvet for skirt.
12 x description on how to make the angel and attached you will find photos as well as brief32 inch piece of wide lace for bottom of skirt ( three inches wide )
24 x 4 inch piece of scalloped lace for sleeves.
Ribbon for wrists and front of dress. approximately one metre.
Purchased wedding collages of flowers ( if desired ) in white ( your choice ) for draping the dress.
Thick tacky glue of choice. I do not use a glue gun.
Cone or plastic cut to cone shape.
Heavy duty sewing thread for gathering.
Tiny beads and a bow for embellishment.
Sunday, November 22, 2009
Update
My where dies time go when you are working. Our daughter and son in law moved into their new home yesterday and things will get back to normal. I miss the confusion and I can't believe that I said that. After six weeks of two families under one roof, furniture and all we did it, they have their first home and we are now going to start helping them finish renovate this.
I have surpassed my 100 hats and will share the patterns that are mine and some pictures this week. I have made another very bright quilt that is yet to be quilted, but it will do. I want to make a couple of dozen bean bags for the nursing home.
I have dolls that need to be dressed for the shelter for Christmas Eve and I am getting a bit excited about all of this now.
I also have finished another " Comfort Kitten ", as well as a few small items.
As a special favour I am going to rewrite a ladybug hat patter in both crochet and knit, one that will go up to size 4 and I have a hope and prayer that I can also include dimensional wings that actually look, oh so real.
Off for a bit.........promise to log on later.
Hugs
Linda
Monday, October 26, 2009
Pay It Forward
I will share more pictures of my hats that are done this week. I have completed close to ninety crocheted and knit hats and will reach my goal soon, but will not stop as there is such a need for a warm head and heart.
More works in progress

.JPG) These little projects are nearing completion and will have mroe stitches, beadwork and decisions before they are finished. I have to work on these this evening and hopefully they will be ready this week to be posted.
These little projects are nearing completion and will have mroe stitches, beadwork and decisions before they are finished. I have to work on these this evening and hopefully they will be ready this week to be posted.Needle N Thread thread painting.
.JPG) I am so pleased with the tutorial offered on the Needle N Thread blog that I had to get mine started and not in the sequence of lessons. Heaven forbid if I should be that one person who follows things line for line. I love the detailed lessons and now I am starting to work on the round sections...........I know the squares were first and then some leaves.......I can see room for improvement but I am not used to stitching with just one strand of thread for this type of work, but I am loving the lessons.
I am so pleased with the tutorial offered on the Needle N Thread blog that I had to get mine started and not in the sequence of lessons. Heaven forbid if I should be that one person who follows things line for line. I love the detailed lessons and now I am starting to work on the round sections...........I know the squares were first and then some leaves.......I can see room for improvement but I am not used to stitching with just one strand of thread for this type of work, but I am loving the lessons.Prayer Pouch - Falling roses.
.JPG)
 I truly enjoy designing prayer pouches with special people in mind. This one has a cascade of falling roses that are held down with little green silk ribbon leaves. A tear drop falls from the base of one rose, and the antique lace sets off the sprig at the top. It is also embellished with a touch of gold ribbon on the front and a pink prayer bow on the back. The straps are silk ribbon and they are fully lined. On a prayer and a wish and this little pouch leaves for a new home.
Prayer Pouch - Bleeding Hearts
.JPG)
.JPG) This little pouch reminds me of bleeding hearts. I chose to make the flowers in a gathered style and then added long dangled beads from the centres. I also used 7mm over dyed green ribbon and did some matching leaves. The lace cuttings are from a larger piece that I have been cutting from and I have been debating on whether or not to dye the rest with tea dye, but decided on the simplicity of white. The little pouch is lined and made with love. All I have to do is say a prayer and mail this one out.
This little pouch reminds me of bleeding hearts. I chose to make the flowers in a gathered style and then added long dangled beads from the centres. I also used 7mm over dyed green ribbon and did some matching leaves. The lace cuttings are from a larger piece that I have been cutting from and I have been debating on whether or not to dye the rest with tea dye, but decided on the simplicity of white. The little pouch is lined and made with love. All I have to do is say a prayer and mail this one out.Willowberry Designs - Verendah View
.JPG) I have finished embroidering this gorgeous little quilt from Willowberry Designs called Verendah Views and used a few more colours. I also went with a log effect rather than the little one inch borders that set them apart.
I have finished embroidering this gorgeous little quilt from Willowberry Designs called Verendah Views and used a few more colours. I also went with a log effect rather than the little one inch borders that set them apart.I have them pinned and ready to be basted and put in a frame. I love to hand quilt and this small quilt will be one of my favourites when done. I have pressed where I will end the quilting and add a wide border or lace or scallops, not sure which as yet, but I am so pleased to be able to start hand quilting this one this week.
I have totally enjoyed reading and stitching Verendah Views as we all can attest to the designs in each of these blocks.
Gail Pan Sesign - Christmas Wish Quilt
.JPG) Having returned to sewing mode again I decided that if I drew on the designs on the little blocks and then embroidered them they would not get finished and just sit in a basket like a lot of my little blocks do, so this time I selected two feature fabrics, one I had more of than the other and i chose to set it together with the first border in a solid green so that the above colours would be added when the embroidery is finished. I love the sentiment and time that Gail has put into these designs.
Having returned to sewing mode again I decided that if I drew on the designs on the little blocks and then embroidered them they would not get finished and just sit in a basket like a lot of my little blocks do, so this time I selected two feature fabrics, one I had more of than the other and i chose to set it together with the first border in a solid green so that the above colours would be added when the embroidery is finished. I love the sentiment and time that Gail has put into these designs..JPG) This is phase one, the blocks are all drawn onto and set together with two prints, one red and one green and bordered. I am now picking out the threads that I will chose and will put this in my special stitching corner to start right away. These are so inspirational. I also have one block extra for the back and hope to be able to put the word " Family , and Pray, what a treasure this little wall quilt will be and hopefully it will share this Christmas with us.
This is phase one, the blocks are all drawn onto and set together with two prints, one red and one green and bordered. I am now picking out the threads that I will chose and will put this in my special stitching corner to start right away. These are so inspirational. I also have one block extra for the back and hope to be able to put the word " Family , and Pray, what a treasure this little wall quilt will be and hopefully it will share this Christmas with us.Wednesday, September 30, 2009
Dahling Lil Denim
.JPG) This is my first " snuggle sac " for baby ever and I did this one on two needles. I also added openings for ribbons at the top and then knit a little hat from soft white fuzzy yarn and put a little denim string bow on so this could be for either a little boy or girl.
This is my first " snuggle sac " for baby ever and I did this one on two needles. I also added openings for ribbons at the top and then knit a little hat from soft white fuzzy yarn and put a little denim string bow on so this could be for either a little boy or girl.This one is very heavy and warm as our winters are cold here in Canada and double worsted was used.
I am in the process of using a brushed chunky on culars for my next one and will share when done.
This will not be kept either, it will be a gift to go in the Christmas box of the church.
Small ones for local neo natal unit.
.JPG)
These little hats were so much fun to do. I did a total of three of them, the next one you will see in the snuggle sac picture.
For the white one I cast one 54 stitches using size 4.5 mm needles and did a 6 row rib. I then added about four to five inches in straight knitting, then decreased to the top and finished.
For the orange one the same, but this is the reverse side as it makes the little pumpkin look more original. I cast on the same number of stitches but after the ribbing I purle every 6th stitch......when I got to the last 6 stitches at the top I changed to green and knit for about 8 rows and then closed this off as the stem. I then cast on three one stitch with green, incread to about 7 stitches, then decreased down to five and cast off all in stocking stitching. Left ends long enough to fast the leaf to the stem and to the hat. I have seen hats like this on the internet and their patterns are written more fully than my version.
Total of 66 hats knit to date in spare time. Goal is 100.
Hats for Nursing home Children
.JPG)
.JPG)
.JPG) The above crocheted hats are for the children's ward of a local nursing home and I have enjoyed doing these tremendously. Most are adaptions of " free charity patterns on the internet ."
The above crocheted hats are for the children's ward of a local nursing home and I have enjoyed doing these tremendously. Most are adaptions of " free charity patterns on the internet ."Time does fly.
.JPG)

I remember years ago when Nancy Z of sewing fame did the 5 - 10 - 15 minutes to sew challenge and I kept it up and it amazed me at how much I accomplished,.
While reading Mary Corbett's blog I then took the 15 minutes at a time challenge and it does work. I would not have started the Verendah Views Quilt from Willowberry Designs, not got back at the Walking In A Winter Wonderland quilt from CrabApple Designs and both are moving right along. Stress busters.
Sunday, September 13, 2009
Adult hats in progress and some stitching time.
I started and finished six adult comfort hats over the weekend and have decided to make them much longer so that they can be pulled down over the face, and or, turned up as desired. I want this set to go to the shelters so they need to be warm. You can warm you hands in your pocket, but it is hard to keep your head warm
After a few hours of rearranging the sewing room again. I have to have a change so that all that I am working on is laid out close at hand and my most favourite place to create is on the ironing board as I can bring it to my level, stick pins in it, and still iron and design at the same time.
I did take a few minutes and stitched some embroidery for an on line monthly quilt that caught my eye and started on the second block. I changed the colours a bit and wish now that I had of used a heavier count cotton for them, but it is never to late as these are very small designs with a lot of impact..... and the ones that are done can be made into little toss pillows.
I also want to do about a dozen miniature bean toss bags for the nursing home as the larger ones that I made do not always fit in their games. I was asked what sizes I make and I do the six inch finished and this time these ones will finish at two inches square as they are tossed into a game hole.
Well, off to rest and will share some pics tomorrow.
Thursday, September 10, 2009
Charity Crochet
 Hat from an infamous children's story that I crocheted for a little lad in a nursing home that he can actually wear. He will be so excited that I can hardly wait.
.JPG) A micro-preemie gown that I have crocheted for a local hospital from a pattern on angelcrafts, she is a very talented designer and donates her patterns to a wonderful cause
A micro-preemie gown that I have crocheted for a local hospital from a pattern on angelcrafts, she is a very talented designer and donates her patterns to a wonderful cause

 A collection of fifty plus hats that are going over to the neo natal and neurological as well as chemo ward of our local hospital, the next fifty plus are being readied for local schools and the homeless shelters. Love makes us all have a happy heart. Patterns are designs from basic patterns and a lot of small originals. They range from preemie to adult male and female. I love doing these.
Tuesday, September 08, 2009
Through the eyes of a child.
While visiting my in-laws at a local nursing home we decided to go out into the beautiful paved stone yard and take advantage of the last of the summer sun and the beautiful new padded resin wicker sets that were displayed everywhere.
We parked the vehicle close by as we had just taken dh's parents out for a drive and then as we started down a paver path I noticed a young male nurse playing hide and seek with a little boy in a wheelchair.
Instead of moving away and just pushing the child he would hide behind a chair and the little boy would wheel in and find him and his eyes, hands and arms became the broadest smile I had ever seen.
I sat and watched as he lovingly removed the little boy from his chair and put him on his lap and began to play games with him. This was very moving as most people do not acknowledge that this is one nursing home that does accept children with challenges.
I sat for as long as I could and then proceeded to walk over to where they were sitting under the large gazebo and chat with the young male nurse. We had a long conversation and I could see that he truly loved his work and the little boy loved him.
I commended him on spending such valuable time with the little boy and he began to tell me how much his little friend could communicate without words and how he loved to be with him. The little boy shyly would snuggle closer to him knowing he was safe.
I told the young male nurse how proud I was of him for taking time to spend with the little boy and explained that I had spent over twenty years in and out of a hospital and knew the lonliness that it could bring and I got to go home after my polio treatments, this little boy did not.
I will never forget the love that shone in both their eyes as I walked away and heard them once again begin their Dr. Seuss tales and gamess.
He brought the little boy over before he left on his walk with him around the nursing home gardens and shared his love of life for both his work and the little boy. The little one was safe as he wrapped his legs tightly around his intern.
We bid them a beautiful day as they had made ours and he proceeded to push the little angel over the bridge and through the flowers. God bless you for making my day.
Saturday, August 15, 2009
Sitting in front of the fan
Well the weather here has hit some real highs and with the humid ex level and smog levels high I have chosen to stay indoors. I must admit that as long as I have the air conditioner on and the fans blowing in my face I can deal with this. We did try to go today to an air show at the air force base but when we arrived the humidity was far to great to be even the slightest bit tempting, so we came home.
I have start another set of prayer pouches and was working happily along and I am now at the part where I have to wait until I can shut the fan down in order to bead and embellish. I think Mother Nature or Father Sun are trying to tell me something.
I did finish another set of comfort hats. I have two adult, three children and about five preemie to baby ones. I knit the preemies as they were so much softer to deal with. I think I am well over the mid point at this time and will soon rearrange some photos and group them so it does not take up much space. It is amazing how addicted I am to the one hundred caps.
Will log on when it cools down and share more pics, but not as long as they are now, will group them instead.
I hope when it cools down to be able to get back at my stitching again as I do miss it as well.
Friday, August 14, 2009
Lady Bug Hat Directions

Materials for child's hat:-
50 grams of black soft worsted weight yarn.
50 grams of red soft worsted weight yarn.
50 grams of red soft worsted weight yarn.
Crochet hook 4.50 mm
Using black chain 4 and join with slip stitch to form a circle.
Work 12 half double crochets into circle. Join.
Work 2 half double crochets in each half double crochet around for a total of 24 half double crochets.
Work *one half double crochet in first half double crochet, then 2 half double crochets in next, repeat* around .
Fasten off black and join red.
Work * one half double crochet in first 2 half double crochets and 2 half double crochets in the next half double crochet. * repeat around.
Work a total of seven more rounds in red.
Work ten half double crochets . turn work eight half double crochets, turn, work 6 half double crochets., then single crochet up side of curve to where red is and repeat around until you have a total of four wings, two in front and two in back.
Using Black, reverse work and work four rounds of half double crochet around and end off.
Work one round of single crochet around.
Make a total of six black spots. Following the first two rounds of the hat pattern in black.
Attach onto hat.
Chain eighteen or to taste. Tack the centre of this chain to the centre of the top of the hat, then loop it down and tack it again to form the antennae.
Enjoy.
Copyright North Kentville Knits 2008 L. Boudreau for personal and charity use only.
Thursday, August 13, 2009
Slow Works in Progress
.JPG) This is the top left hand section of a Carnation Quaker Sampler that I am ashamed to say I set aside until I got some new mageyes to work with and now that they are here have to continue to work on this. I just love this design and colour work.
This is the top left hand section of a Carnation Quaker Sampler that I am ashamed to say I set aside until I got some new mageyes to work with and now that they are here have to continue to work on this. I just love this design and colour work..JPG) This was a a design challenge by a friend who wanted to see how we would intepret and use crayons to guide us in our work. So far I have the tree, trunk and roof done, and I am not at all pleased with the right hand tree so will turn it into a seperate tree altogether.
This was a a design challenge by a friend who wanted to see how we would intepret and use crayons to guide us in our work. So far I have the tree, trunk and roof done, and I am not at all pleased with the right hand tree so will turn it into a seperate tree altogether. My Latest six inch block that I am playing with.
.JPG) I love this little work. It was an online class kit that I adapted to my own style and plan on doing a lot more beadwork and fine thread work on before framing. I am addicted to silk ribbon embroidery.
I love this little work. It was an online class kit that I adapted to my own style and plan on doing a lot more beadwork and fine thread work on before framing. I am addicted to silk ribbon embroidery.


Subscribe to:
Posts (Atom)